Wireguard VPN

Why install a VPN?
With the recent Covid-19 pandemic; working from home (or remote working) has become cruical, as part of the worlds efforts to suppress the rising number of infections of the Covid-19 virus. Many organisations may be already prepared and have VPN technology and remote working policies in place. However, for some organisations this might be something entirely new.
There are a number of different VPN solutions, with different benefits and downsides (which we will avoid going into detail today).
Wireguard is:
- small and lightweight
- incredibly efficient
- offering a boost in bandwidth throughput and performance
- integrated into the latest Linux Kernel (5.6+)
So this blog post covers the simple instructions we followed, inorder to remote into some of our clients networks. In this example, we setup a VPN endpoint on AWS EC2.
EC2/Linux Configuration
Setup the server
Install wireguard on Amazon-Linux-2
curl -Lo /etc/yum.repos.d/wireguard.repo https://copr.fedorainfracloud.org/coprs/jdoss/wireguard/repo/epel-7/jdoss-wireguard-epel-7.repo
yum install epel-release
yum install wireguard-dkms wireguard-tools
Create an empty server config file with proper permissions
mkdir /etc/wireguard && cd /etc/wireguard
bash -c 'umask 077; touch wg0.conf
wg genkey > /etc/wireguard/private.key
wg pubkey < /etc/wireguard/private.key > /etc/wireguard/public.key
Create the inital configuration, copy and paste the following into wg0.conf
[Interface]
Address = 192.168.2.1
PrivateKey = server_private_key
ListenPort = 54321

[Peer]
PublicKey = client_public_key
AllowedIPs = 192.168.2.2/32
Then run the following to add the keys:
sed -i "s/server_private_key/$(sed 's:/:\\/:g' private.key)/" wg0.conf
dont forget to add the clients public key when your ready later…
Next start wireguard:
modprobe /usr/lib/modules/4.14.171-136.231.amzn2.x86_64/kernel/net/wireguard.ko
ip link add dev wg0 type wireguard
wg-quick up wg0
Enable IP forwarding
sysctl -w net.ipv4.ip_forward=1
Enable the service to start on boot
systemctl enable wg-quick@wg0.service
Setup a firewall
This next step really depends on your network setup, in the example below we allow all traffic to be routed through wireguard, to access the external services on the public internet. But you probably want to redirect traffic to your cloud apps, or other environments.
iptables -A INPUT -m conntrack --ctstate RELATED,ESTABLISHED -j ACCEPT
iptables -A FORWARD -m conntrack --ctstate RELATED,ESTABLISHED -j ACCEPT
iptables -A INPUT -p udp -m udp --dport 54321 -m conntrack --ctstate NEW -j ACCEPT
iptables -A INPUT -s 192.168.2.0/24 -p tcp -m tcp --dport 53 -m conntrack --ctstate NEW -j ACCEPT
iptables -A INPUT -s 192.168.2.0/24 -p udp -m udp --dport 53 -m conntrack --ctstate NEW -j ACCEPT
iptables -A FORWARD -i wg0 -o wg0 -m conntrack --ctstate NEW -j ACCEPT
iptables -t nat -A POSTROUTING -s 192.168.2.0/24 -o eth0 -j MASQUERADE
netfilter-persistent save
Hopefully, provided there were no errors, your wireguard VPN is 99% ready. You just need to configure individual peers, and add the peers public key’s and expected IP address.
Setup a Linux Client
First, we create the configuration file. I call it client.conf in this example.
cd /etc/wireguard/
nano client.conf
Paste the following text into the editor.
[Interface]
Address = 192.168.2.2/32
PrivateKey = client_private_key

[Peer]
PublicKey = server_public_key
Endpoint = [insert_aws_ec2_ip_here]:54321
AllowedIPs = 0.0.0.0/0
Windows Configuration
A high performance and secure VPN client that uses the WireGuard protocol. TunSafe makes it extremely simple to setup a super fast and secure VPN tunnels between Windows and Linux.
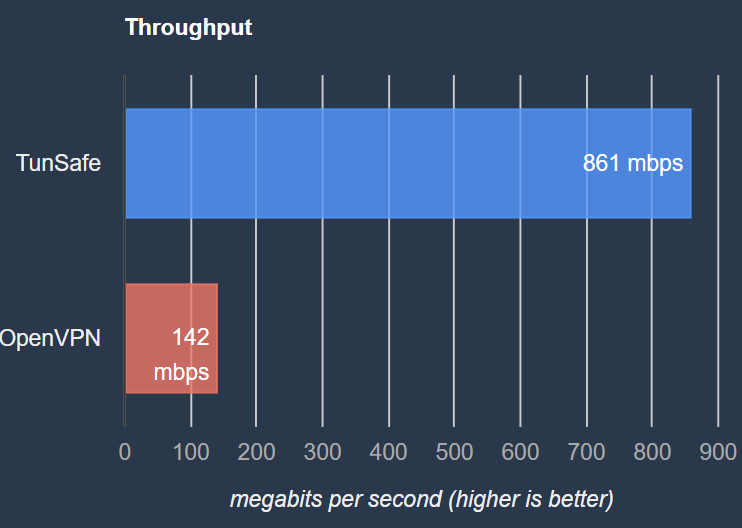
Compared to more well-known VPN software Openvpn, Wireguard offers a much greater performance and throughput boost:

The configuration is similar to Linux, use the generate keypair to generate a private and public key. Stick the private-key in your configuration file, and pass the public-key to your vpn administrator, or add it to the peers of your server config.
Share on: