Prevent Phishing with DMARC
The common problem
Threat actors commonly conduct social engineering attacks against organisations using fake emails. For example, by modifying the sender’s address or other parts of an email header to appear as though the email originated from a different source.
This is a common method used by adversaries to increase the likelihood of compromising systems as they know that users or customers are more likely to open a malicious attachment from your-organisation.com rather than from random-unaffiliated-domain.com.
What is DMARC
It stands for “Domain-based Message Authentication, Reporting & Conformance”, is an email authentication, policy, and reporting protocol.
But before we get into DMARC, we first need to introduce SPF and DKIM
SPF aka Sender Policy Framework
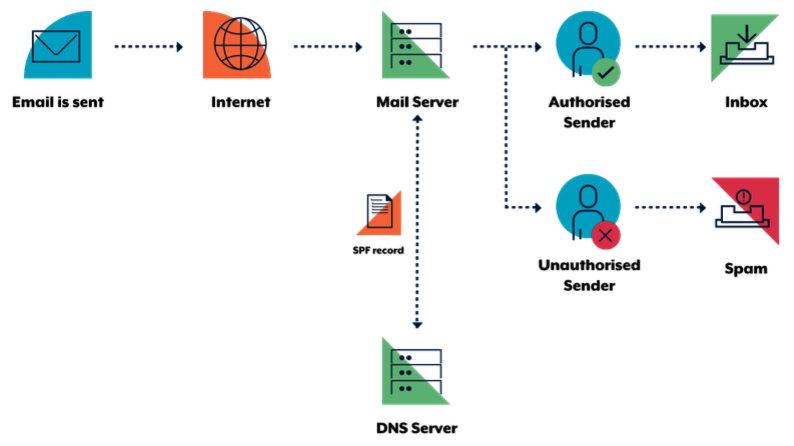
SPF is an email verification system designed to detect fake emails. As a sender, a domain owner publishes SPF records in DNS to indicate which mail servers are allowed to send emails for their domains.
When an SPF enabled server receives email, it verifies the sending server’s identity against the published SPF record. If the sending server is not listed as an authorised sender in the SPF record, verification will fail. The following diagram illustrates this process.
Identify outgoing mail servers
Identify your organisation’s authorised mail servers, including your primary and backup outgoing mail servers. You may also need to include your web servers if they send emails directly. Also identify other entities who send emails on behalf of your organisation and use your domain as the email source. For example, advertising or recruitment firms and newsletters.
Construct your SPF record
SPF records are specified as text (TXT) records in DNS. An example of an SPF record might be v=spf1 a mx a:<domain/host> ip4:
- v=spf1 defines the version of SPF being used
- a, mx, a:<domain/host> and ip4:
are examples of how to specify which server are authorised to send email - -all specifies a hard fail directing receivers to drop emails sent from your domain if the sending server is not authorised.
An example record, that utilises Office365:
example.com. 3600 IN TXT "v=spf1 include:spf.protection.outlook.com -all"
An example that uses Mimecast:
example2.com. 3600 IN TXT "v=spf1 include:_netblocks.mimecast.com -all"
An example that uses their own mail servers:
example3.com. 300 IN TXT "v=spf1 +a +mx +ip4:103.129.99.17 +ip4:103.129.99.18 -all"
Identify domains that do not send email
Organisations should explicitly state if a domain does not send emails by specifying v=spf1 -all in the SPF record
for those domains. This advises receiving mail servers that there are no authorised sending mail servers
for the specified domain, and hence, any emails claiming to be from that domain should be rejected.
Protect non-existent subdomains
Some mail servers do not check that the domain which emails claim to come from actually exists, so proactive protection must be applied to non-existent subdomains. For example, adversaries could send emails from your-organisation.com or sub-domain.your-organisation.com even if the subdomains dev or test did not exist. Protection of non-existent subdomains is provided using a wildcard DNS TXT record.
Deploy your SPF record
When you have an SPF record you intend to deploy, ensure the Time to Live (TTL) is set low (e.g. 5 minutes). Setting the TTL low will allow you to correct or rollback your SPF record quickly in the case of an issue.
DKIM aka DomainKey Identified Mail
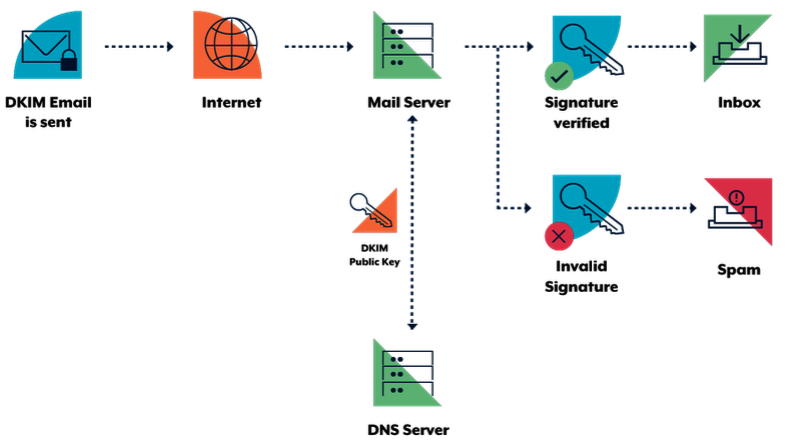
The DKIM standard uses public key cryptography and DNS to allow sending mail servers to sign outgoing emails, and receiving mail servers to verify those signatures. To facilitate this, domain owners generate a public/private key pair. The public key from this pair is then published in DNS and the sending mail server is configured to sign emails using the corresponding private key.
Using the sending organisation’s public key (retrieved from DNS), a receiver can verify the digital signature attached to an email. The following diagram illustrates this process.
Decide when to sign your outgoing email
DKIM verification may fail if signed sections of emails are changed during delivery. This can happen without the interference of adversaries. For example, if you sign an email but then attach a legal disclaimer, you will likely invalidate the DKIM signature as the content of the email has now changed. To ensure the DKIM signatures on outgoing emails are not invalidated, you need to understand your email infrastructure and when the content of emails is changed.
Generate your public and private keys for DKIM
You will need to find a tool to generate a public/private key pair. The tool of choice will depend on your organisation, its key management plan and operating system. In the absence of organisation specific tools, there are tools such as PuTTYgen8 for Microsoft Windows or ssh-keygen for Linux and macOS. Information on how to use these tools is available in Oracle’s Generating a Secure Shell (SSH) Public/Private Key Pair publication9. After creating the public/private key pair, make sure you protect your private key in accordance with your organisation’s key management plan. If your private key becomes public, any adversary will be able to sign emails as yourself. You may want to generate multiple public/private key pairs if you want different parts of your organisation to have the ability to independently sign emails.
Publish your public key in your DNS record
Public keys for DKIM are published in DNS TXT records. You will need to include a different TXT record for each private/public key pair you want to use by using a selector. You will then need to configure your mail server to specify the correct selector when sending emails.
Make sure you put the public keys at <selector>._domainkey.your-organisation.com where selector must be different for every public/private key pair. For example you might have dev._domainkey.your-organisation.com and test._domainkey.your-organisation.com for different offices in your organisation.
The content of the record itself will be similar to v=DKIM1; k=rsa; p=<your public key>.
Identify domains that do not send email
Organisations should explicitly state if a domain does not send emails by specifying v=DKIM1; p= in the DKIM record for those domains. This advises receiving mail servers that there are no valid public keys for that domain and any emails claiming to be from it should be rejected. This should be done for each domain and subdomain using wildcard DKIM records.
Warn your users
As for SPF, notify users of the change so they are aware and can communicate any unexpected change in email behaviour.
DMARC
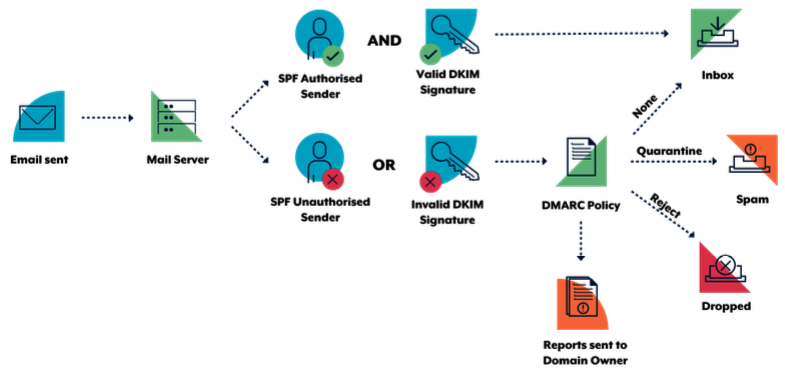
DMARC enables domain owners to advise recipient mail servers of policy decisions that should be made when handling inbound emails claiming to come from the owner’s domain. Specifically, domain owners can request that recipients:
- allow, quarantine or reject emails that fail SPF and/or DKIM verification
- collect statistics and notify the domain owner of emails falsely claiming to be from their domain
- notify the domain owner how many emails are passing and failing email authentication checks
- send the domain owner data extracted from a failed email, such as header information and web addresses from the email body.
Notifications and statistics resulting from DMARC are sent as aggregate reports and forensic reports:
- aggregate reports provide regular high level information about emails, such as which Internet Protocol (IP) address they come from and if they failed SPF and DKIM verification
- forensic reports are sent in real time and provide detailed information on why a particular email failed verification, along with content such as email headers, attachments and web addresses in the body of the email.
Like SPF and DKIM, DMARC is enabled when the domain owner publishes information in their DNS record. When a recipient mail server receives an email, it queries the DMARC record of the domain the email claims to come from using DNS. DMARC relies on SPF and DKIM to be effective. The following diagram illustrates this process.
DMARC Modes
Quarantine mode
When you believe that your email traffic is protected by SPF or DKIM, you can implement a quarantine policy. This will result in DMARC enabled servers marking emails from your domain that fail verification as spam. Even if you request that only a small percentage of your email traffic have a quarantine policy applied, you will still get the full statistical reports that show what is happening with your emails. Eventually, as implementation problems are resolved, you can gradually increase your implementation to 100 percent.
Reject mode
Following testing using a quarantine policy, implement a reject policy. This will result in DMARC enabled servers rejecting emails that fail SPF and DKIM verification. Again, you can request that this policy only be applied to a small percentage of your emails (with the remaining percentage being quarantined) and monitor the results through reports. The same gradual increase to 100 percent can be implemented based on reports and feedback from users.
An example of such a DMARC record is
v=DMARC1; pct=50; p=none; sp=quarantine; ruf=mailto:authfail@your-organisation.com; rua=mailto:aggrep@your-organisation.com where:
- v=DMARC1 defines the version of DMARC being used
- pct=50 specifies the percentage of emails subjected to filtering
- p=none specifies the policy for your organisation domain
- sp=quarantine specifies the policy for all organisation subdomains
- ruf=mailto:authfail@your-organisation.com states the email address to which forensic reports should be sent
- rua=mailto:aggrep@your-organisation.com states the email address to which aggregate reports should be sent.
Note, if you plan to send your DMARC reports to a domain that is not the domain for which the DNS record exists, you will need to include a special record in the receiving domains DNS record.
Examples of what your DNS records may look like for different scenarios
Domains that don’t send email
your-organisation.com. TXT “v=spf1 –all”
*.your-organisation.com. TXT “v=spf1 –all”
*._domainkey.your-organisation.com. TXT “v=DKIM1; p=”
_dmarc.your-organisation.com. TXT “v=DMARC1; p=reject; ruf=mailto:authfail@your-organisation.com; rua=mailto:aggrep@your-organisation.com”
Domains which send email
your-organisation.com. TXT “v=spf1 a mx a:domain1.com ip4:1.2.3.4 –all”
*.your-organisation.com. TXT “v=spf1 –all”
selector1._domainkey.your-organisation.com. TXT “v=DKIM1; k=rsa; p=MIGfMA0GCSqGSIb3DQEBAQUAA4GNADCBiQKBgQC3QEKyU1fSma0axspqYK5iAj+54lsAg4qRRCnpKK68hawSd8zpsDz 77ntGCR0X2mHVvkf0WEOIqaspaG/A5IGxieiWer+wBX8lW2tE4NHTE0PLhHqL0uD2sif2pKoPR3Wr6n/rbiihGYCIzvuY4/U5G igNUGls/QUbCPRyzho30wIDAQAB”
_dmarc.your-organisation.com. TXT “v=DMARC1; p=reject; ruf=mailto:authfail@your-organisation.com; rua=mailto:aggrep@your-organisation.com”
Subdomains which don’t send email
subdomain.your-organisation.com. IN TXT “v=spf1 –all”
*.subdomain.your-organisation.com. IN TXT “v=spf1 –all”
*._domainkey.subdomain.your-organisation.com. TXT “v=DKIM1; p=”
Subdomains which send email
subdomain.your-organisation.com. IN TXT “v=spf1 redirect=your-organisation.com”
*.subdomain.your-organisation.com. IN TXT “v=spf1 –all”
selector1._domainkey.subdomain.your-organisation.com. TXT “v=DKIM1; k=rsa; p=MIGfMA0GCSqGSIb3DQEBAQUAA4GNADCBiQKBgQC3QEKyU1fSma0axspqYK5iAj+54lsAg4qRRCnpKK68hawSd8zpsDz 77ntGCR0X2mHVvkf0WEOIqaspaG/A5IGxieiWer+wBX8lW2tE4NHTE0PLhHqL0uD2sif2pKoPR3Wr6n/rbiihGYCIzvuY4/U5G igNUGls/QUbCPRyzho30wIDAQAB”
Share on: