Powershell BDD with Pester

What is BDD
Behavioral Driven Development (BDD) is a software development approach that has evolved from TDD (Test Driven Development). It differs by being written in a shared language, which improves communication between tech and non-tech teams and stakeholders. In both development approaches, tests are written ahead of the code, but in BDD, tests are more user-focused and based on the system’s behavior.
What is Pester
Pester provides a framework for running Unit Tests to execute and validate PowerShell commands. Pester follows a file naming convention for naming tests to be discovered by pester at test time and a simple set of functions that expose a Testing DSL for isolating, running, evaluating and reporting the results of PowerShell commands.
Pester tests can execute any command or script that is accessible to a pester test file. This can include functions, Cmdlets, Modules and scripts. Pester can be run in ad hoc style in a console or it can be integrated into the Build scripts of a Continuous Integration system.
Installing Pester
Pester should be pre-installed with Windows 10 and Server 2016, but we recommend updating, by running this PowerShell command as administrator:
Install-Module -Name Pester -Force
Why use Pester
Before Pester, on occasion we were limited to a certain set of tools on a customer site. The traditional compliance assessment tools such as Tenable Nessus were not available; but being on a Windows Network we had Powershell available.
Using Powershell we could knock up tests to perform a compliance assessment by utilising the registry configuration of the environment builds and additional third party software. For instance using the CIS hardening compliance checks for Chrome; but this lead to dense code that wasn’t necessarily easy to read and maintain.
For example the following code, first has to check whether the registry key exists, before querying the key value and determining whether our check passes:
#1.1.1 (L2) Ensure 'Allow invocation of file selection dialogs' is set to 'Enabled'
if((Get-Item -Path hkcu:\SOFTWARE\Policies\Google\Chrome).GetValue('AllowFileSelectionDialogs') -ne $null){
  $val=Get-ItemProperty -Path hkcu:\SOFTWARE\Policies\Google\Chrome -Name "AllowFileSelectionDialogs"
  #write-host $val.AllowFileSelectionDialogs
  if ($val.AllowFileSelectionDialogs -eq 1){
    $badcount++
    Write-Host -foregroundcolor red "[FAIL] 1.1.1  (L2) Ensure 'Allow invocation of file selection dialogs' is set to 'Enabled'"
  }
  if ($val.AllowFileSelectionDialogs -eq 0){
    $goodcount++
    Write-Host -foregroundcolor green "[PASS] 1.1.1  (L2) 'Allow invocation of file selection dialogs' is set to 'Enabled'"
  }
With Pester this becomes much easier (to read and maintain) due to the natural language interface. For instance the same check becomes:
Describe 'Chrome Checks' {

 Context 'CIS compliance checks...' {

  It '1.1.1 (L2) Ensure "Allow invocation of file selection dialogs" is set to Enabled' {
    Get-ItemProperty -Path hkcu:\SOFTWARE\Policies\Google\Chrome -Name "AllowFileSelectionDialogs" | Should match 0
  }
 }
}
The advantages are:
- code is cleaner and easier to read
- code is easier to maintain and modify
- non-technical staff members should be able to understand the instructions/code
An Example Developing Tests with Pester
Create New Test/Module
Create a new folder
mkdir Tests
Enter the folder via powershell
cd Tests
type: new-fixture -Name [name of module]
new-fixture -Name AV
open AV.Tests.ps1, where we will write our instructions to check the Anti-Virus Configuration
write your tests
$here = Split-Path -Parent $MyInvocation.MyCommand.Path
$sut = (Split-Path -Leaf $MyInvocation.MyCommand.Path) -replace '\.Tests\.', '.'
. "$here\$sut"

Describe 'AV Checks' {
	Context 'Checking AntiVirus is Running'{
	  It 'Windows Defender is running' {
		get-process -Name 'MsMpEng' |Should be $true
	  }

	  get-mpcomputerstatus| foreach-object {

	    It 'Antispyware Enabled'{
			$_.antispywareenabled |Should match $true
		}
		It 'Antispyware Signatures uptodate'{
			$_.AntispywareSignatureAge | Should match 0
		}
		It 'Antivirus Enabled'{
			$_.antivirusenabled |Should be $true
		}
		It 'Antivirus Signatures uptodate'{
			$_.AntivirusSignatureAge | Should match 0
		}
		It 'RTP Enabled'{
			$_.realtimeprotectionenabled |Should be $true
		}
		It 'Behavior Monitor Enabled'{
			$_.behaviormonitorenabled |Should be $true
		}
		It 'OnAccessProtection Enabled'{
			$_.OnAccessProtectionEnabled |should be $true
		}
		It 'Antivirus Quickscan age < 7 days'{
			$_.quickscanage| Should belessthan 7
		}
	}
	}
}
Run a single module
Run a single module using the -Script flag
Invoke-Pester -Script <module>.ps1
Invoke-Pester -Script AV.ps1
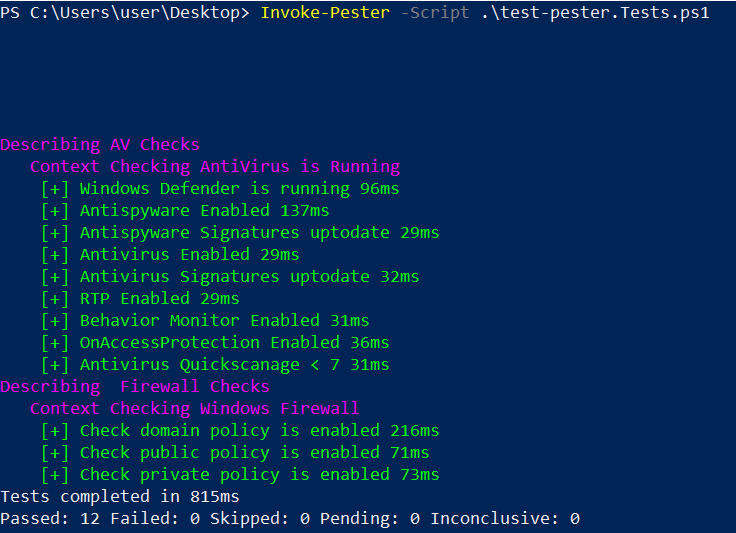
What happens when a test fails?

Not only is the failed test highlighted in red, but the module counts the number of passes and fails and highlights these and the end of the script.
Run all Modules
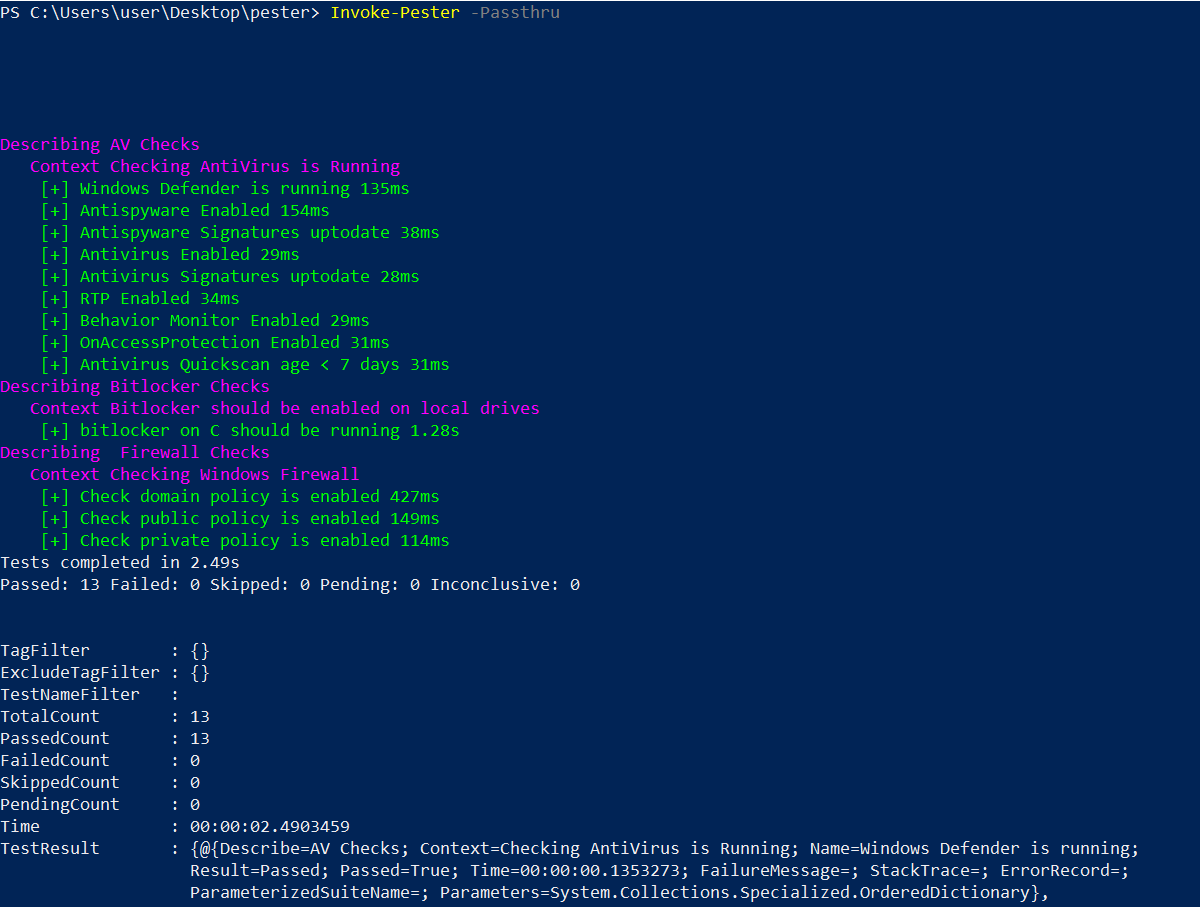
Enter the appropriate folder that contain all your pester scripts and enter the following to run all tests:
Invoke-Pester -Passthru
As you can see in the evidence above, we wrote some additional checks that examine the Firewall and bitlocker configuration.
Conclusion
This is a simple example of the many uses of BDD and where it can simplify and improve the methodology in Operational and Audit environments. Pester is a powerful tool, that has many more features (that have not been highlighted here). It enables pentesters and potentially incident responders to quickly and effectively design and code checks for compliance or evidentiary purposes; due to the natural language interface.
Also as an added benefit to the natural language should the business decide to implement more and different checks, by providing the language template, non-technical staff members can easily read and code further enhancements or additional code.
References
Share on: