When Resilience Fails, Don't Panic!

With ransomware and wiperware being the criminals choice of earning a quick buck, having a secure backup is more important than ever. But what happens when resilience fails? and you risk losing your backups. This post discusses the attempted recovery of OSX’s Timemachine, after it has become faulty.
This post describes the steps our team took, to recover a clients corrupted Time Machine backup.
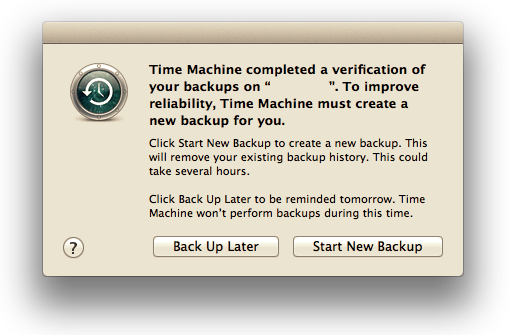
You may see the following message as a warning that something has gone wrong with Time Machine:
First things first - Stop Time Machine as you dont want to risk corrupting the backup further, or from OSX starting from scratch.
- Open the Time machine Preferences
- Select ‘Off’
Then in ‘Finder’ open your Time Machine folder.
Either run this command in Terminal:
$ sudo chflags nouchg "/Volumes/<TM Name>/image.sparsebundle/token”
Or:
- Right click - /Volumes/
/image.sparsebundle - Select ‘Show Contents’
- Right click - token
- Select ‘Get Info’
- Untick the locked ‘tick-box’
Now we should be ready for the next step.
If you do not know the name of your Time Machine or sparsebundle, go to Time Machine Preferences and it should be listed there. To find the name of the sparse bundle, type:
$ ls /Volumes/<TM Name>/
which will give you a file with the .sparsebundle extension. You now want to attach that sparsebundle to a disk mount.
Then to attach the disk without mounting, type:
$ hdiutil attach -nomount -readwrite -noverify -noautofsck “/Volumes/<TM backup name>/<mybackupname>.sparsebundle”
the result should be something to the effect of:
/dev/disk2 GUID_partition_scheme
/dev/disk2s1 EFI
/dev/disk2s2 Apple_HFS     <Your Volume name>
Take note of the disk for Apple_HFS (or Apple_HFSX). It will be /dev/diskXs2 where X will be a number sequentially allocated by your machine (in the example above, you can see the attached disk became disk2).
This next step is where it starts to get difficult and may take some time (Try not to do this on WiFi unless you really have no other choice).
Basically, we attemp a repair of the sparsebundle.
Some sites said to use diskutil, and other sites strongly disagree with using diskutil because it fails you risk losing everything. Instead the recommendation is to use fsck_hfs.
Start with running the following which will attempt to rebuild the catalog btree in the sparsebundle.
$ fsck_hfs -drfy /dev/diskXs2
After it completes (it may appear to hang some times), hopefully the response will be:
‘The Volume was repaired successfully’
In the window that opens, delete the file called “com.apple.TimeMachine.Results.plist” if it exists.
Using a text editor or Property List Editor, open the file called “com.apple.TimeMachine.MachineID.plist”.
Change this value to ‘0’ instead of whatever number it is:
<key>VerificationState</key>
<integer>0</integer>
Delete these lines:
<key>RecoveryBackupDeclinedDate</key>
<date>2018-10-12T12:38:43Z</date>
Save your changes and close any open windows for the disk image. You may also need to unmount the share that your disk image is on.
Everything should hopefully be complete, and you can access time machine once again!
Warning: This can take up to 72 hours on large images, if your lucky enough to have a smaller image ~300GB this can take 16 hours.
Our clients disk had this output:
** /dev/rdisk2s2
** Checking Journaled HFS Plus volume.
** Detected a case-sensitive catalog.
** Checking Extents Overflow file.
** Checking Catalog file.
** Rebuilding Catalog B-tree.
** Rechecking volume.
** Checking Journaled HFS Plus volume.
** Detected a case-sensitive catalog.
** Checking Extents Overflow file.
** Checking Catalog file.
   Incorrect number of thread records
(4, 13716)
** Checking multi-linked files.
** Checking Catalog hierarchy.
   Invalid directory item count
   (It should be 0 instead of 1)
   Invalid directory item count
   (It should be 3 instead of 4)
   Incorrect folder count in a directory (id = 3795486)
   (It should be 0 instead of 1)
** Checking Extended Attributes file.
** Checking multi-linked directories.
** Checking volume bitmap.
** Checking volume information.
   Invalid volume free block count
   (It should be 37267681 instead of 37310834)
   Volume Header needs minor repair
(2, 0)
** Repairing volume.
** Rechecking volume.
** Checking Journaled HFS Plus volume.
** Detected a case-sensitive catalog.
** Checking Extents Overflow file.
** Checking Catalog file.
** Checking multi-linked files.
** Checking Catalog hierarchy.
** Checking Extended Attributes file.
** Checking multi-linked directories.
** Checking volume bitmap.
** Checking volume information.
** The volume Backup of Buzzard was repaired successfully.
Share on: