Offensive Implants Part 1

As technology moves forward over time, we miniaturise our hardware to have a smaller physcial footprint. Additionally, if you pick up naked Single Board Computers (SBC) from up-coming developers, you can get a great deal on value for money. This board is currently available at $12USD, which means for a disposable computer this is a very interesting platform to start some offensive development. Also its size is 46x26mm!
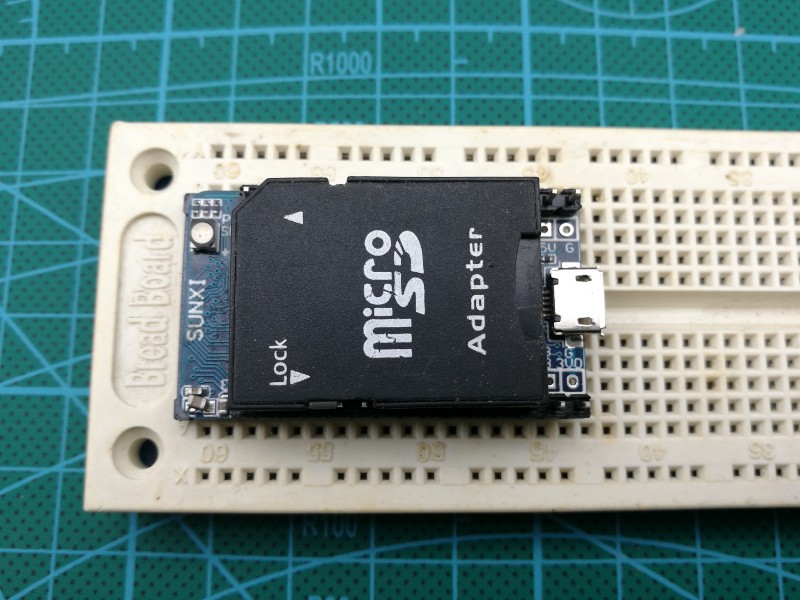
The Lichee Pi The board is similar to the infamous Raspberry-Pi, and uses a micro-sd (or tfcard) to house the boot operations and Operating System. This helps keeps the cost down compared to other eMMC and NAND based storage boards.
Kernel and U-boot sources available from: https://github.com/Lichee-Pi
Below are some more pictures of the LicheePi v1, and how it compares in size to a traditional sdcard.
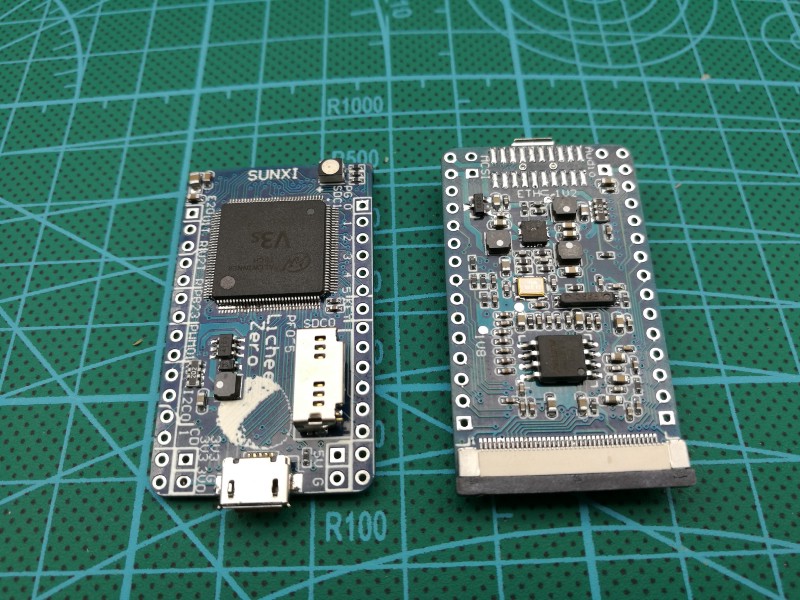
The later designs of the Lichee Pi have changed slightly but its physical dimensions have not changed.
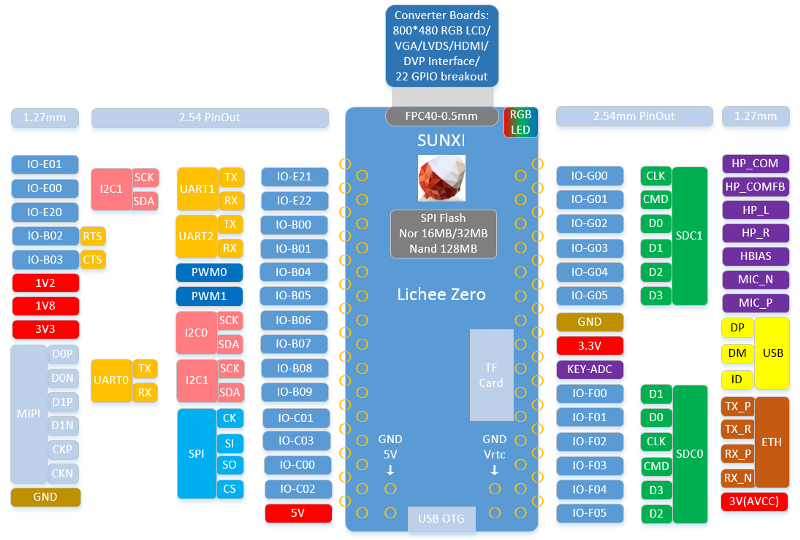
And finally a handy pinout:
Specification
The default specification is as follows:
- 1 GHz SoC
- 64 MB DDR2 360MHz RAM
- 10/100Mb Ethernet (through USB OTG or CDC Ethernet)
- 1x Micro-USB jack (female)
- 1x Micro-sd / tfcard Reader
Getting Started
The pre-compiled kernels, rootfs, and images to easily get started are all available from: https://pan.baidu.com/s/1eR6uIsy
DD Image
A pre-compiled dd-image to get you started can be found in the dd_img folder: http://bit.ly/2EkiXYd
We used the minimal image mindb_dd.tar.gz
Apply the image in exactly the same way you would a traditional Raspberry Pi, using dd or Win32DiskImager. The default image is based on a 2GB image, if you use a larger card you will want to use resize2fs to extend the main partition size. You can refer to Raspberry Pi’s script, to do this…
Create & Enable a Swap file
Don’t forget that we’ll need a swap file, as this SBC is not as powerful as a traditional computer:
Create a 128MB swap file:
dd if=/dev/zero of=/swap bs=1M count=128
Setup swap file:
mkswap /swap
Enable swap file:
swapon /swap
Write to /etc/fstab, and it will be auto enabled when boot up
/swap swap swap defaults 0 0
Make sure swap file is enable
root@Lichee:~# free
total used free shared buffers cached
Mem: 54672 50816 3856 0 3180 28864
-/+ buffers/cache: 18772 35900
Swap: 131068 12 131056
Compiling the Kernel
Like us you may want to get a head start on developing the customising your own kernel, this can be advantageous when you want to change a configuration in the kernel or support additional modules like WiFi!
Install cross-compile toolchain
Download from:
- https://releases.linaro.org/components/toolchain/binaries/latest/arm-linux-gnueabihf/ execute the following (you may need to alter the version of gcc-linaro xz file?):
wget https://releases.linaro.org/components/toolchain/binaries/latest/arm-linux-gnueabihf/gcc-linaro-6.3.1-2017.05-x86_64_arm-linux-gnueabihf.tar.xz
tar xvf gcc-linaro-6.3.1-2017.05-x86_64_arm-linux-gnueabihf.tar.xz
mv gcc-linaro-6.3.1-2017.05-x86_64_arm-linux-gnueabihf /opt/
vim /etc/bash.bashrc
# add: PATH="$PATH:/opt/gcc-linaro-6.3.1-2017.05-x86_64_arm-linux-gnueabihf/bin"
arm-linux-gnueabihf-gcc -v
Download & Compile Linux Kernel
(default brach is zero-4.10.y):

git clone https://github.com/Lichee-Pi/linux.git
cd linux
mkdir out
make ARCH=arm licheepi_zero_defconfig
make ARCH=arm menuconfig
# make your changes in the kernel
make ARCH=arm CROSS_COMPILE=arm-linux-gnueabihf- -j6
make ARCH=arm CROSS_COMPILE=arm-linux-gnueabihf- -j6 INSTALL_MOD_PATH=out modules
make ARCH=arm CROSS_COMPILE=arm-linux-gnueabihf- -j6 INSTALL_MOD_PATH=out modules_install
After success compile the binary componts that you need to copy to the micor-sd-card image are:
- zImage — found under arch /arm/boot/,needs to be copied to the /boot partition
- driver ko’s — found under out/, need to be compied to the main paritition, under /lib/modules
Debugging the Kernel
The Lichee Pi has a UART interface for debugging the boot sequence. Connect a Bus-Pirate or 5v UART cable to UART0 (see pinout above, its on the left-hand side on the inner-most 2.54mm holes). On the software side Windows users should use TeraTerm (Sorry, but PUTTY does not really play nice here) a COM_X port should be available (use Device Manager to work out the correct number). Linux users can search for /dev/ttyUSB_X, or run dmesg after connecting the device to find the correct ttyUSB number.
Power up the Lichee Pi, and hopefully you can then use a terminal program to connect over the default serial interface of the Pi /dev/ttyACM0! (or COMX on Windows).
The Design
Netscylla never finished customising an Android Kernel for a custom Nethunter addition of our cheaply sourced Amazon phone, as it was down to will it brick or not brick? having tested the built image in an emulator — the emulator would not boot, so we lost confidence in the image building scripts for our specific model of phone.
So we thought we would start with some of the missing Nethunter functionality: USB gadgets and Configfs. So we set about configuring and designing a malicious gadget that could support HID, Mass Storage and Ethernet.
ConfigFS
Configfs is for creating, managing and destroying kernel objects from user-space, and sysfs for viewing and manipulating objects from user-space which are created and destroyed by kernel space.It is typically mounted at /sys/kernel/config (or more rarely at /config). — Wikipedia
History
- gadgetfs introduced in late 2003 (enables userspace gadget drivers)
- composite framework added in 2008 (enables multi-function gadget drivers)
- FunctionFS added in 2010 (now userspace gadget functions can be combined with kernel gadget functions in a composite gadget) However, we are still stuck creating custom kernel modules to glue N instances of M functions together for unique use cases
Why ConfigFS?
A userspace API for creation of arbitrary USB composite devices using reusable kernel gadget function drivers. Supports all major existing gadget functions except FunctionFS and mass storage in 3.11 3.13 added conversion of FunctionFS and mass storage Therefore, it caters for all the USB device types we want to emulate.
Configuring Gadgets
This has never been easier, and there are lots of walkthroughs for the Pi, though there are some odd differences? For instance some people struggle with OSX, however, OSX works out of the box for me, but Ive had difficulties with Windows 10.
Base template
The initial template for our gadget, we can then add functions in the appropriate placeholder:
cd /sys/kernel/config/usb_gadget/
mkdir g1
cd g1
echo 0x1d6b > idVendor # Linux Foundation
echo 0x0104 > idProduct # Multifunction Composite Gadget
echo 0x0100 > bcdDevice # v1.0.0
echo 0x0200 > bcdUSB # USB2
mkdir -p strings/0x409
echo “ch0000001” > strings/0x409/serialnumber
echo “000000001” > strings/0x409/manufacturer
echo “PiZero USB Device” > strings/0x409/product
mkdir -p configs/c.1/strings/0x409
echo “Config 1” > configs/c.1/strings/0x409/configuration
echo 250 > configs/c.1/MaxPower
# Add functions here
# End functions
ls /sys/class/udc > UDC
Serial Adapter
#serial adapter function
mkdir -p functions/acm.usb0
ln -s functions/acm.usb0 configs/c.1/
dont forget to start the serial service somewhere in your script or in systemd!
Ethernet Adapter
#ECM ethernet adapter function
mkdir -p functions/ecm.usb0
# first byte of address must be even
HOST=”48:6f:73:74:50:43" # “HostPC”
SELF=”42:61:64:55:53:42" # “BadUSB”
echo $HOST > functions/ecm.usb0/host_addr
echo $SELF > functions/ecm.usb0/dev_addr
ln -s functions/ecm.usb0 configs/c.1/
# End functions
Then add the following at the end of the file to assign a static ip
#put this at the very end of the file:
ifconfig usb0 172.16.1.1 netmask 255.255.255.0 up
route add -net default gw 172.16.1.2
HID (Keyboard) Emulation
mkdir -p functions/hid.usb0
echo 1 > functions/hid.usb0/protocol
echo 1 > functions/hid.usb0/subclass
echo 8 > functions/hid.usb0/report_length
#Below echo-line needs to fit on one line to work correctly (beware of copy and paste here)
echo -ne \\x05\\x01\\x09\\x06\\xa1\\x01\\x05\\x07\\x19\\xe0\\x29\\xe7\\x15\\x00\\x25\\x01\\x75\\x01\\x95\\x08\\x81\\x02\\x95\\x01\\x75\\x08\\x81\\x03\\x95\\x05\\x75\\x01\\x05\\x08\\x19\\x01\\x29\\x05\\x91\\x02\\x95\\x01\\x75\\x03\\x91\\x03\\x95\\x06\\x75\\x08\\x15\\x00\\x25\\x65\\x05\\x07\\x19\\x00\\x29\\x65\\x81\\x00\\xc0 > functions/hid.usb0/report_desc
ln -s functions/hid.usb0 configs/c.1/
This should be enough for the kernel to create /dev/hidg0
You can test the hid device with the following code that should print ‘A’ on the console
echo -ne “\x2\0\x4\0\0\0\0\0” > /dev/hidg0;echo -ne “\0\0\0\0\0\0\0\0” > /dev/hidg0
In Part 2 we will orchestrate a method of gluing these functions together to create custom composite gadgets on the fly.
To be continued…
Share on: